Showing posts with label Thrifty Thinkin'. Show all posts

Monday, June 24, 2013

DIY: How to Make a Backyard Firepit Out of a Salvaged Dryer Drum

My husband and I are fire fans. Fans of fire. Bonfires in particular.

We live on a military base and have a very small fenced in back yard, but we didn't want to have to experience summer here without being able to enjoy evenings outside by a blazing fire. We had been looking for months hoping to find a nice looking, good quality and reasonably priced fire pit, but it seems that all the remotely nice ones were $80 at least, some even up to $200. That just seemed outrageous for me. I had been weekly checking craigslist hoping on would pop up, but while I was waiting I was seeking out alternatives. At first we thought we might cut down a large metal barrel and just use that, but then I stumbled upon a most genius idea (thank you, pinterest): FIRE PITS MADE OUT OF WASHER/DRYER DRUMS!

 
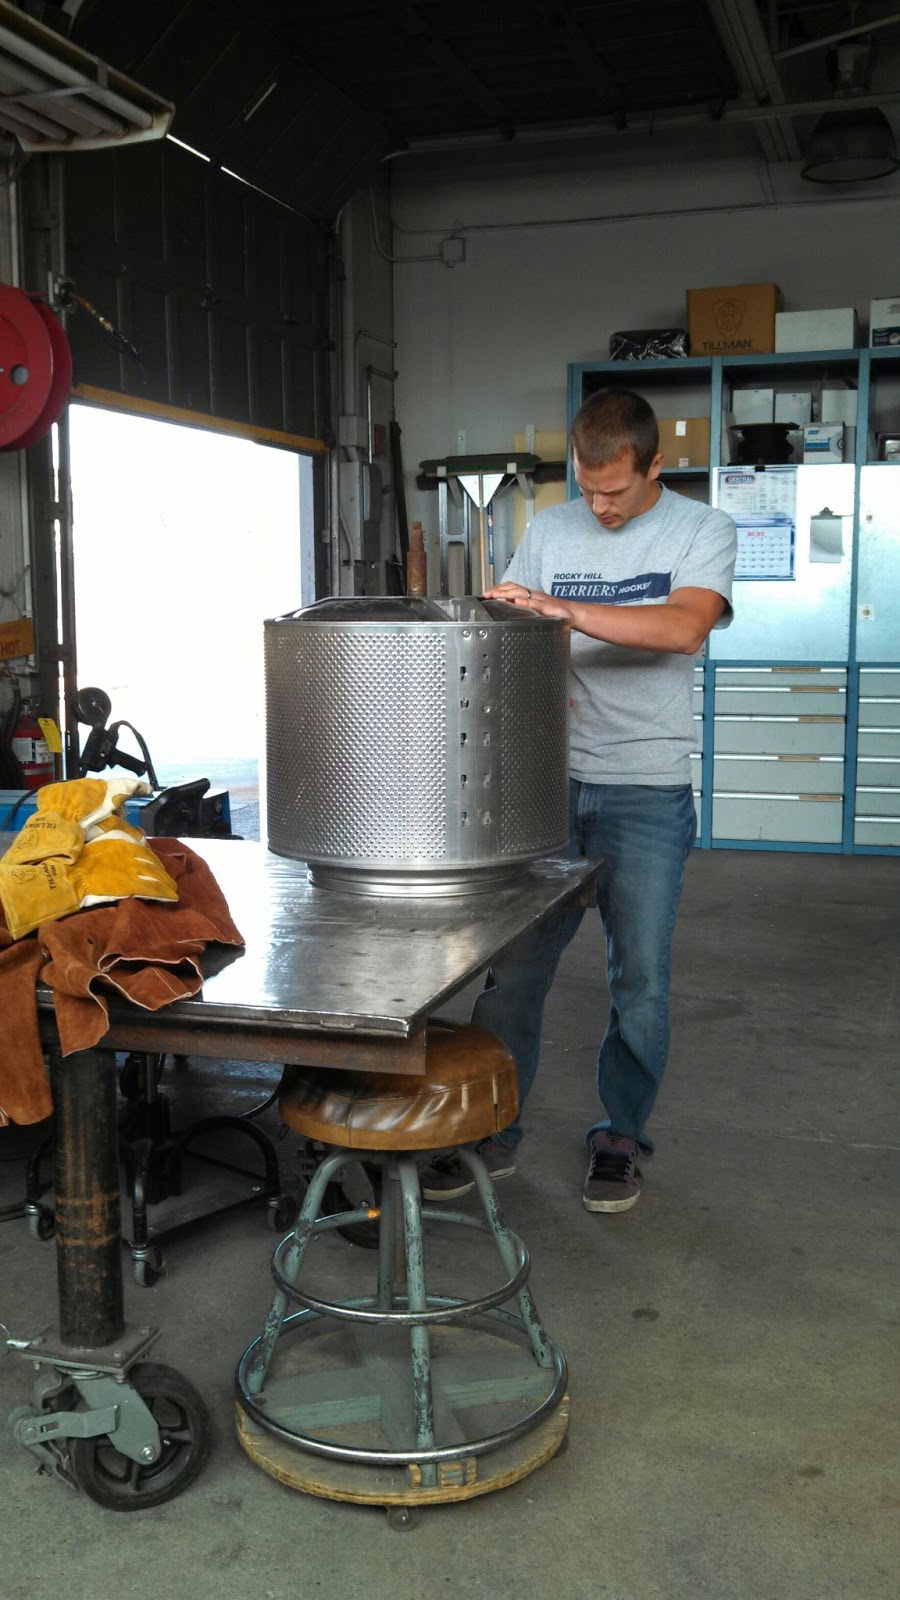
The moment I saw that people were converting the insides of washing machines into bonfire receptacles I knew we had to make one. I was very surprised when I was able to find a drum on Craigslists just a few days later. The man selling it had it listed as a Washer drum, but upon further inspection we have decided it in an industrial/laundry mat sized drum from a dryer. I am not sure how he came upon it, but that is no matter. It had already been removed from the actual dryer and for $25 it was ours! (If you wanted to create something similar I recommend looking for old washers/dryers out to the side of the road, or finding a cheap salvage place. I've heard that the drums are easy enough to remove, but hopefully you get lucky like us and someone does that step for you.).

drum, upside down, before we did anything to it
 
It was a bit of a process start to finish, but we love the way it came out. The way we went about creating it might not be possible to everyone, as we have access to a lot of equipment and tools, due to my husbands job maintaining structures for the Air Force. However, with a little craftiness and know-how, you could easily create something similar on your own. 
 
In summary we-actually he, while I took pictures- took off the...spike...on the back (some part which connected it to the dryer; it was just screwed in) and removed all plastic parts from the inside.

Next, he drilled some extra holes in the bottom and top, just to allow water to drain (all the holes in the sides are part of the drum design and they make for really great air flow!). Then it got trickier: my husband welded three legs with feet on the bottom, punched holes in them, sand blasted them and screwed them onto existing holes in the drum.
You could definitely do without the legs, but we thought it gave it more of a finished look. Another option would have been to leave the spike on the bottom part on and drive it into the ground for stability. But, if you have welding skills, put them to use!


After he had done all the tricky bits at his shop, we brought it home and I painted it with 3 coats of black Rust-Oleum high heat spray paint. That was about $7 at Lowes; it is made for grills and can withstand heat up to 1,200 degrees F. NOTE: ONLY PAINT THE OUTSIDE PARTS ON IN CONTACT WITH THE FIRE! Paint really made it look finished and it so far holds up very well to the high temperatures.

We love how it turned out! We've had several fires and are looking forward to many more with this lil' beauty. We had a lot of fun working on it. Start to finished it took us between 3 and 4 hours, and cost us $32! Function and frugal, not to mention a pretty good conversation starter. We couldn't be happier!

Wednesday, June 5, 2013

How to Save Money on a Hawaiian Vacation (or any vacation):

My husband and I just recently returned from a 8 day trip to Oahu, Hawai'i. It was our combination honeymoon/anniversary trip. We were so blessed to be able to spend our first anniversary in such a beautiful place!
As you may know, going to Hawaii can be very pricey. There are a lot of variables on the cost of a trip, such as where you are flying from, and the type of place you choose to stay, etc, but overall it can be a rather high cost place to visit as far as the USA goes, because it is an island. Food, especially, can be very costly there as it is mainly imported. Regular grocery items can cost up to twice as much.

I'm not one to normally discuss numbers and finances, but I think this may be beneficial to some, so I am posting it. With some careful planning and budget we were able to enjoy 8 days in Honolulu for $2,000.  Not per person. Yes, total. Two people, 8 days, hotel, food, rental car, activities (including beaches, hikes, jet skis, a catamaran cruise, snorkeling, a luau, and significant historic sites)= two thousand.

I have done a little research and there is not exact number as far as what a trip/honeymoon to Hawaii can cost you, but after reading several articles and travel magazines I have come to the conclusion that the average for a week is about $1,500 per person. So I think we did pretty alright.

Please do keep in mind we are a military couple, so we did get some great deals related to that. We stayed at a military resort (the Hale Koa, right on Waikiki, if anyone is interested), which was lovely and much lower priced than your average Hawaiian resort. We had a nice balcony room (which we, by favor, got as an upgrade) which we were charged about $90 a night(ground floor price). We also got a deal on the rental car, and were able to save about $200 off the extra fees they would normally charge (due to age and whatnot) because my husband is in the Air Force. But a lot of the money we saved was purely being frugal.

 Initially we had planed on taking a military "hop," but we decided that was a little to risky for us. Planes only went from our base to Hickam once or maybe twice a month and our budget couldn't afford us getting stuck there. As plan B, we got a great deal on plane tickets. We live on the West Coast and were able to fly, without lay overs, straight there. Tickets to Hawaii based on where you are flying from can be anywhere from $300 to $1,500 per person round trip. We flew Alaska Airlines and ours were very closest to the lowest possible price on that scale.  Another huge factor in ticket cost is the season: Hawaii is considered to have its peak season of tourism from November to March. Since we went in the end May, that also saved us a bunch.

********
I am not going to give any more exact break downs of what we spent.  On to the frugality tips...

*LUNCHES/PICNICS:
The first day we arrived we hit up a grocery store to stock up on lunch items. Family who had been before had already warned us about the high food prices so we had packed some snack items in our luggage from home and then purchased rolls, cheese, lunch meat and the like from the grocery store (commissary @ Pearl Harbor for you military folk) and kept it in our hotel room fridge. We spent about $30 on lunch goods for the week. Since we planned to spend most mornings on the beach we figured packing our own lunches would save us a bunch rather than having to find a place to eat out or have a meal at the resort. If you figure that sandwiches or your average lunch foods would be about $20 total bill for the both of us for 8 days, that simple move right there saved us about $130. We did eat lunches out a couple times, but overall that plan worked great.

*ACTIVITIES:
While food on Hawaii is high price, activities are fairly cheap if you choose carefully. What is NOT cheap is doing the 800 different tours the resort will try to offer you. We went to some great places: We snorkeled in Hanauma Bay Nature Preserve, we hiked Diamond Head Crater, we went to Pearl Harbor and ferried out to the USS Arizona Memorial, we hiked to Manoa Falls, amongst other things. We also enjoyed many different beaches, all of which were free (except for the occasional parking fee). The resort offered all manner of tour packages for luaus, sightseeing, and museums. Heck, they had shopping center tours! But honestly, with the rental car (or with Hawaii's huge bus system) you can easily enjoy the island without paying for someone else to bring you places. Most the places we went parking was about a dollar and admission was $5-$8 per person.

Maybe in some situations would be nice, but we had a great time without them. HERE is a list of some tour options: PRICEY! As a comparison, you can do a "Pearl Harbor Experience" for $119.00. We went to Pearl Harbor. The Arizona Memorial is free to all, you just have to wait for it to be your turn for the ferry. There are other museums, battleships and monuments you can see for a charge, but we enjoyed several hours there just walking around looking at memorials and going through their Valor in the Pacific centers (mini museums). You can also purchase an MP3 tour for about $20. We also visited some other places which the tour covers, like downtown Honolulu, Iolani Palace, the Kamehameha statue and Punchbowl cemetery, all for free. Plus, you have so much more freedom to enjoy things at your own pace when you don't have to worry about keeping up with a group. This is just one example of many. Do your research in advance, use resources like Pinterest, Yelp, or Trip Advisor and figure out where you want to go and what you want to see and then just go do it for yourself! With a rental car and GPS the possibilities are quite endless! Adventures are fun!

Also on the topic of activities: CHECK GROUPON! This applies to Hawaii or any place you intend to visit. You can get deals on local restaurants, shops and activities! I browsed through the Honolulu offers several times before we left and there were many great offers for things like surf lessons, massages, fancy restaurants, and all sorts of water sport rentals. We personally purchased a lovely catamaran sunset cruise for half off its normal price. It ended up being one of our favorite things we did there!

We did "splurge" and do a luau at the Hale Koa as we felt it was worth it. There are many Luaus to choose from and they can be pricey, but it just seems necessary for the Hawaiian experience. We also splurged a bit and rented a jet ski. Decide what you want to do, save where you can and then spend where you want to!

*SHOPPING:
We aren't shoppers. We do not so much like to browse and wander stores. We do not like to purchase many things. So we save money by not shopping. Honolulu had MASS amounts of malls and shopping centers but we avoided them for the most part. We did get some souvenirs, home items, clothing items and COFFEE but over all this isn't a big chunk of where our money goes on vacations.


*DINNING:
Obviously, the best way to save on dinning is to not dine at super fancy places. On past trips elsewhere we have also gone to the other extreme and dined at places like taco bell too many times and while we saved money, we felt ill. Find a happy medium. Maybe plan for a nice romantic dinner or two, and then for the rest of the trip see what else you can find. We love local food and little less-frequented-by-tourists establishments. Farmers markets or food trucks and sometimes have great deals on local cuisine. The fresh fruit is the best! We also stopped at a flea market and got several different local handmade breads which served as snacks and breakfasts a couple days. Other Tips: Order water. Sometimes we get an appetizer (its always calamari) and split a meal. Sometimes we have salads and a dessert. Or two meals and split dessert. And then there is alcohol: we aren't what you call drinkers, but Hawaii is not really Hawaii without a few fruity rum beverages. Those $8 drinks can add up real quick and take a huge chunk out of a budget, so...just consider that.
   *********
 
Just as is with any vacation, with a little careful planning and budgeting you can have a great time for a relatively reasonable amount of money. Does anyone have any other tips I missed? I can't wait to post more photos and stories about our lovely trip to the gorgeous island of Oahu!

Wednesday, May 1, 2013

Thrifty Thinkin': On Eating, Food Budgets and Couponing, Etc...

When I moved out here in December, finally able to live with my husband and do exciting dreadful things like grocery shopping I had utterly no idea how much food two people would need in a week, or a month, or a day for that matter, or what a food budget for 2 people trying to eat reasonably healthy should look like. And I loathed grocery shopping, which didn't help much.

I grew up in a frugal family. But I knew not-too-much about grocery shopping. I am good at money saving, but rarely did my homeschooled past teach me about buying grocery staples for two. When there are 10 people in your family it is not common practice to shop in a grocery store, you see. My mom shopped in bulk 98% of the time- Sam's Club, B.Js, etc and belonged to Natural Food Co-ops where food came by the crate. I don't know what my family's food budget was, but come checkout time it was usually $200-$300 + for a single trip.

This left newlywed me slightly confused: what does like...1 item, such as a jar of salsa cost...instead of like 15 of them. How much milk do two people need; probably not like 5 gallons a week. Only my husband eats meat; how much meat does he eat? And on and on...also, I had no idea how to cook for only two people, but that's another story.

Disclaimer: I am still newly married, only 22, and truly probably have no idea about anything. But I'm learning and this post is simply a reflection of those recent learnings.

I live on an Air Force base and I do all my shopping at the commissary here (with an occasional natural food store or farmer's market trip). It is close, convenient, tax free (sale tax in WA is over 9%). Every month my husband and I are allotted ~$348.00 as our allowance for food (aka: "BAS"- we love a good acronym for everything...). Initially, I had no idea if that was enough for two people. Was I supposed to spend all of it? Half of it? Was it only half of what I needed for us?

The first couple shopping trips I was baffled. The first couple months I was way over our BAS. But every month since December I have whittled down our food budget (in our defense, the first month or two we had NOTHING and had to buy all the basic staples. Items like ketchup, all the spices known to man, baking powder and salt. Now we are well stocked).

I have now discovered that our $348 a month toward food is MORE than enough and we are able to put a large chunk of that into savings each month. I aim to keep a well stocked pantry and freezer, and always make sure we have enough fresh foods for a week or so. The pantry and fridge are kept clean and organized so we (I) know what we have.

We don't have a specifically set food budget other than I'll be in trouble if I go over $348, but I try to keep each shopping trip (3 per month) at $80 or less. Meaning, at most $240 a month, which is a savings of about $100 out of our allotted amount. I try and keep the month spending between $200 and $240. That works for us and a newlywed couple (with one furbaby). Obviously this is a slightly different number than what it would be if I was not shopping tax free (and commisary prices are a tad cheaper as well), but hopefully this gives you an idea.

Here is what I have learned in the last couple months of being the chief grocery shopper and cook:'

1. Make a list. Better yet, make the list and bring it with you. And use it. Cross items off as you go. And don't buy extra stuff unless it is extremely justifiable (if I see they are having a sale on a nonperishable/something we eat regularly, I will stock up. Things like that.) I use a pen and paper, but there are also Apps which you can download for grocery lists. Trying to shop without a list is just asking for troubles. You will forget things. You will buy other things you don't need. And then you will have to make another trip to get the stuff you forget, and subsequently buy more things you don't need. Which leads to...

2.The more trips you make, the more you will spend. Simple Concept. I am amazed by some people who can do one grand shopping trip for the entire month. You can save a lot that way, but it also requires a lot of freezer space, which I do not have. I have managed to knock my trips down to 3 times a month, rather than weekly though. I try and plan what I need for meals in advance and shop for a week and halfs worth of food. I am able to freeze some fresh produce and I freeze all of our breads, bagels, etc, as well as our meats so everything keeps as long as possible.

3. Don't bring my husband. Generally he and I are happy to do any boring/tortuous activity together. However, grocery shopping it better alone. He is a bit of a whiner. He is also one to add things to my cart not on my list. Plus, if he is there I am distracted and I forget things. I love him whole-heartedly but it is better to just leave him out of this one.

4. The more junk food I manage to purchase, the more we will eat. This is more of a health tip than a shopping/frugality tip. I have simply noticed if that we have 4 bags of reese's in the pantry they will be eaten up very quickly. If they aren't in the house, we cannot eat them in ridiculous amounts. Simple.

5. Try and shop the outer aisles the most, and the inner ones sparingly. Most of my shopping trips consists of fresh produce, or things like eggs, milk and meat. I try and limit our processed foods in takes pretty seriously. Yes, those items are cheap and on sale, but it isn't worth it for what it can do to my health. I don't buy any freezer meals, premade-anything or ready-made mixes. Convenience costs, always. It may take a bit of time and effort, but making foods from scratch can save a ton! I am not one to try and stick to a diet or certain way of eating, but we try and eat as much fresh, whole, unprocessed, clean, good-for-us food as possible. I always try to make sure that the items in the cart are in majority healthy. Fresh veggies are actually cheaper than microwave meals!!

6. Don't shop on a military pay day: the commissary is a nightmare. This is just a military side tip. I've also learned I much prefer shopping on a weekday afternoon (usually Tuesdays) than I do a weekend or evening. It's a lot calmer; I already hate shopping without having to play bumper-carts with other shoppers. This works with my currently unemployed schedule and it means I get to spend more time on the weekend with my husband. Matter of preference.

7. Buy in bulk, but only when it makes sense. As I mentioned, I know all about shopping in bulk. I can compare unit prices like a boss (a price comparing boss...). However, there are only two of us. Shopping in bulk only make sense if you can eat the item in the amount of time that it is still fresh/ you won't be sick of it from having to eat it daily. I buy all my baking items, flour etc, in the largest quantity available at your average grocery store. I buy large quantities once a month of chicken and beef and carefully freeze it. When buying items like, tomato sauce, I buy the largest jar and keep it in the fridge after opening. Today I bought a 10 pound bag of potatoes (we love 'em!) for 99 cents. If we can eat it before it goes bad then yes, we buy it in bulk. I never want to be throwing out rotten or expired food because I bought too much of it; that isn't savings at all!

8. USE COUPONS! Yes, I am a couponer. Not like *those ones on TV*. Just...a practical one. Couponing for healthy foods is a little tricky. Generally if a company is big enough to offer manufacturer's coupons then they are probably not the best for you. A lot of the stuff is processed and has an eternal shelf-life. However, when possible, I use coupons.

I love Coupons.com. You select coupons you'd like and print them at home. I also use (exclusive to military) the Commisary Rewards program, which allows me to select and load coupons to my Commissary Rewards card to be scanned at checkout. I don't get a newspaper, but my kind mother sends me nice notecards full of clipped coupons from home that she thinks I might like. It's fabulous.

I am not getting food for free and I don't have any sort of "stock pile" going, like the TV couponers, but I do save money every trip. Usually only like $5 (off products like Coconut Milk, shredded cheese and bacon), which may seem small, but it adds up. Since beginning my shopping adventures in December I have saved, to date $81.00 in coupons. For us, that is equivalent to 1 weeks worth of food paid for in coupons. And that makes me happy. I have a goal to save at least $200 in coupons by this years end. Again, it is not a lot, but it counts.
I bought a shopping list with file-folder type pockets at Target and I use that for all my list making and couponing needs. In the back I keep a tally of what I spend per month and what I've saved in coupons. It works for me!
Hopefully this post winds up helpful to someone. I've learned a lot, but I am still going to keep learning and trying to better perfect our food spending each month!

*end note: I grocery shop with a debit card. Yes, paying cash is a great technique to keep to a budget, but I am pretty good as calculating costs in my head and making sure I stick to my desired amount. We never, ever shop with a credit card as we are determined to live debt free! We do have a couple, but rarely are they used and they are always paid off by the month's end.

*end note 2: I am not really sure how this effects our budget, but I only buy meat for 1 person-my husband- as I am a vegetarian. I do buy some Morning Star and Boca-type products but I try and get my protein elsewhere. I would *imagine* this keeps our costs down as well.

*end note 3: we rarely, rarely eat out, save for the occasional Friday date night. At most, I'd say twice a month. I enjoy cooking homemade, and JoJo likes eating it. This saves us a lot. We do go out, we are able to use what we are saving on our food budget for a nice dinner.

*the end for real.

Sunday, April 28, 2013

Hand-Painted Art for My Kitchen: "Where You Invest Your Love..."

This post has been a long time coming. This project was finished a couple weeks ago, but I was waiting to get it hung up (with the help of my husband) before posting.

As you know, I live in a little cook-cutter, white walled, baby house on an Air Force Base. Base housing is far from character-filled...in fact it is a little stark white and very un-personal. We are allowed to paint or hang stuff, but it must be returned to the state we found it in upon leaving, which being in the military, you never can be sure when that will be. Someday we will live in an old house, full of charm and character, but for today we don't. For now, I am trying to make my little baby house as homey, charming and personal as I can without investing to much into it, as it is, after all, only temporary (only probably a year or so).

We were able to purchase plenty of furniture for our house together and now I am left with the task of doing the little ("girly") tasks of decorating. I'm not a huge fan of white walls, and white walls without art are super sad. I, however, have trouble finding art that I like within our budget, so I have therefore be doing the DIY thing (which I do anyway but..).

About a month back on a weekend, my husband and I were at his shop (he works in a Civil Engineering Squadron doing Structures). They have a bin of junk wood and scraps. He was throwing some stuff in there when I spotted this...cabinet door-like thing...
I am still not sure what it was. Looks like a cabinet door, but it has 6 weird little hooks on it, and no signs of and hinges ever being there so...it's a mystery. But I liked it. It looked like it wanted to be painted on. I waited another week of it being in the scrap bin before I ..*pilfered* it for my own.

I decided on painting some of my favorite song lyrics on it. "WHERE YOU INVEST YOUR LOVE, YOU INVEST YOUR LIFE." (Mumford and Sons: Awake, My Soul). If I was the sort to get tattoos, that would already be on me somewhere, but as I am not quite that sort I figured painting it as art for my kitchen was a close substitute. I pondered getting some stencils to make the letters crisp and precise, but that is not really indicative of myself. Instead, I free handed it. I did pencil in some lines to help keep it all straight- I have an horrible inability to make straight lines without ruler guidance.
 Lyrics alone don't make a painting for me, so I bordered it in some Hungarian-inspired flowers. Hungary has some gorgeous embroidery which has always been part of decorating my family's home (my grandfather was from Hungary and one of my sisters is adopted from there), so I decided to bring some into mine.I am incapable of embroiderying such beauty, but painting it is fun.  I considered painting flowers to also mimic Polish paper art (called Wincynanki), to honor my Polish heritaged husband. But it is incredibly detailed and when I practiced on other paper my flowers looked awful in paint, so I scratched that plan and stuck with my own roots. When I finished my couple days of painting it, I sealed it with spray varnish.
I am pretty pleased with how it came out. It's unique, I think. That's probably why I like it so much. JoJo helped me get it screwed into our kitchen wall and it now is hanging over our little dinning area. Just one more little bit of homey charm to our house!
Still a little stark and sad, but getting happier! If you can't tell, I'm a fan of color. You can't see the rest of my kitchen in this photo, but all the colors present in the flowers are basically the color scheme of my kitchen. Anything with a folksy print, bright color, or vintage vibe is welcome. I suppose salvaged cabinet door wall art fits in nicely.
 

Wednesday, April 17, 2013

Thrifty Thinkin': Healthier Homemade Blueberry Muffins

I am rather infamous for things I can cook in a muffin pan. Breakfast quiches, cupcakes, rolls, pancake bites, stuffed pizza bites, brownies, mini popcorn balls, baked macaroni...etc. A muffin pan is probably my #1 kitchen necessity. However, up until this week I had never made actual muffins in my muffin pan. I had actually never made muffins in my life.
Usually every weekend I try to come up with a reasonably quick and healthy breakfast that I can make in advance and then either quickly heat in the oven of in the microwave before my Airman husband has to get to work in the early morning during the week. Usually it involves eggs (and probably in a muffin pan). But this week I thought I might give something else a go- BLUEBERRY MUFFINS!
I did a little pinterest hunt and came up with this: Blueberry Muffins According to Martha Stewart. Then I did a little tweaking of my own. I followed her recipe exactly except for 3 minor changes. Instead of the 1 1/4 cups of white sugar (something I do my best to avoid in large amounts) I substituted in 3/4 cups of honey.  Because of the honey burning easier than white sugar, I also lowered the oven temp from 375 to 350 instead. Then, instead of the 1 cup of milk (something I also try and avoid in large quantity, especially now since some milk contains unlabeled aspartame), I substituted 1 cup of unsweetened original flavored coconut milk. You could also use soy milk, almond milk, etc.


So:  Here is Martha's Recipe (Martha Stewart Living, July/August 2000), with my changes in bold.
  • 6 tablespoons unsalted butter, room temperature, plus more for tins
  • 3 cups plus 2 tablespoons all-purpose flour
  • 3 teaspoons baking powder
  • 1 teaspoon salt
  • 1 1/4 cups sugar, plus more for sprinkling (3/4 cups of honey. I did sprinkle a little white sugar on top though)
  • 1 large egg
  • 2 large egg yolks
  • 1 teaspoon pure vanilla extract
  • 1 cup milk (1 cup unsweetened coconut milk)
  • 1 3/4 cups blueberries
 
I preheated my oven to 350. If using white sugar instead of honey, go ahead and set it to 375.
 
Butter your muffin pan. This recipe makes 6 large muffins or 12 small muffins. I went with the 12.
 
In once bowl, mix/sift together your flour, salt and baking powder and set aside.
 
In another bowl, cream butter and sugar/honey until fluffy, which will take about 3 minutes with an electric mixer, or about 5 with a wooden spoon. As I don't yet own a mixer of any type, I used a google old fashioned wooden spoon for this whole recipe. If you have fancy gadgets like Martha, go ahead and use those.
 
Add in the egg and egg yolks, along with the vanilla to the sugar/honey and butter mixture. Then gradually add in parts of your flour and milk/coconut milk until it is all combined into a dough. This can be done on low with a mixer or by hand. Then gently fold in your blueberries. I used frozen, but fresh would be equally delightful. This is the fun part because you get to watch the mixture turn blueishpurple.
 
Divide the muffin batter between the tins. Sprinkle the tops with sugar. Bake until golden. Approximately 45 minutes for large muffins and about 30-35 for small muffins (this would depend on which temperature you set your oven too, so keep a watchful eye on them!). Before removing from the pan allow to cool for 15 minutes.
Once cool, I removed them from the pan and pack them up in a ziploc baggie, ready to go for the rest of the week. Now at 6:30 AM all I have to do it set a muffin in the microwave for about 45 seconds, slap some butter on it and hand it to my husband as he goes out the door. Easy and delicious!


Tuesday, March 26, 2013

Thrifty Thinkin': Repurposed and Painted Jars for Cute Pantry Storage

As you know, I've been trying my hand at attempting to make as much of our food from scratch and buy as little packaged/process/pre-made foods as possible. But there are still plenty of things that I buy that come in some sort of container, like pasta sauce (although, soon I will be making our own!) and salsa. Often those jars, either plastic or glass, can be reused to store something else. Some of them are actually pretty cool too (Classico pasta sauce comes in a mason- type jar!).

 
 I've always tried to reuse containers whenever possible. Typically I remove the labels with hot water and a sponge and then send them through the dishwasher once. Then I use the jars to organize some of my pantry items, like dried beans, popcorn kernels or rice. After a little while though it was starting to look chaotic with a bunch of sharpie-labeled random jars with lids that didn't match the contents (such as Ragu lid on Kidney beans).


That bugged me. Plus, I am always down for a craft project, so I decided to give those jars a little make over.

First, I picked up a can of Krylon Indoor/Outdoor (basically good on any surface) spray paint in my favorite shade- Cherry Red- at Michael's (40% of with coupon, so around $3.00).
This part was quite the process. I guess I over-estimated the power of spray paint. I brought the lids outside and soon realized that it might just take 3 million coats to cover up the lettering on the lids. But with a little patience (and a final coat count of 5) I got them to be thoroughly Cherry Red. In hind sight, some sort of white primer would have been a really good idea. But it worked regardless.

Next came the fun part. Painting random designs all over the red lids. They don't actually match, they just sort of...coordinate, which is basically a summation of most things I surround myself with. I love color and these lids are sure colorful now. I used an array of acrylic paints and just fooled around with flowers and patterns until I was happy with my lids.


I allowed them to dry for a couple hours and gave them each two coats of  glossy acrylic Americana Sealer (also from Michael's, 40% off for about $3.00).

After letting them dry overnight, I put them back on my jars and now they are super spiffy and bright!


I still have plenty of spray paint left over, so my plan is to continue adding jars and painted lids to my collection as I empty out store bought products. Now my pantry makes me smile! Art belongs everywhere!

Only caution with these is that they are NOT washable. I don't really care since the contents will be pretty consistent and dried beans don't make much mess, but you wouldn't want to try and store anything wet or messy in them. If cleanup is needed, a damp paper towel should do the trick.

These would also be great for office storage for little bits and pieces like paper clips. Or, great in a bathroom for things like cotton balls and Q-tips too! You can make them match your decor! It would also be a fun project for kids to help out with (adults do the spray painting and varnishing, but let kiddos decorate!). I'm thinking it would be super cute for a little girls room/bathroom for storing little hair clips and dainty whatnots.

It is really fun to find purposes for everyday items, especially if they are cute! Let me know if you give them a try!

Monday, March 25, 2013

Thrifty Thinkin': How to use Aluminum Foil as a Dry Ball


You know what they say, "one woman's wad of aluminum foil is another woman's fabric softener." (What? You haven't heard that one?)

As you may know, I am on a bit of a health/thrift/frugal/DIY kick. Besides becoming pricey over time, did you know that dryer sheets are full of all sorts of nasty toxin and chemicals which can harm not only your skin, but your overall health? In this recent post I wrote about how I switched my Snuggle fabric softener and sheet addiction over to more healthy (and cost effective) alternatives. I have to admit, I still have a stash of dryer sheets in my laundry room (closet), but once I use them up I will not be purchasing more for my laundry.

 
Truthfully, this post shouldn't really be a "how to" because the instructions are as simple as can be. Ready? Taking notes? Your one and only step is this: rip a sheet of foil, wad it up, and throw it in your dryer with your clothes.
 
That's all folks. A ball of aluminum foil is not only cheap, but it is great at ridding laundry of static and combating wrinkles. It doesn't add any scent, obviously, but I use scented detergent and scented homemade liquid softener in my wash cycle. You can use the same ball over and over again. I've been using mine for a month, and while it has smoothed out a bit, it still does the job just fine. I guess after a long period of time you might want to replace the ball, but that is easy enough to handle, yes?  The only down side to this method as far as I can tell is the ruckus it makes banging around with the clothes. It doesn't do any damage, it is just slightly noiser than just clothes in the dry alone. My cat thinks it is interesting to listen to though...
 
I'm very happy with this method and will gladly be keeping it in my laundry routine.
 
Another, but slightly more pricey alternative, would be an actual plastic dryer ball. Blue, spikey looking guys? Have you tried them? My mom bought a bunch at a dollar store and I used those when I lived at home. I also hear that they have some with a tube which you can add essenstial oils too, if you want a little added freshness.

Rumor has it you can use balls of felted wool (and scent them) for a similar effect, but that I haven't attempted. If you're interested in trying that method out (I am!) see this tutorial here.

Also, I haven't tried this yet, but I have read that you can use paper coffee filters with a few drops of essential oils on them (or fabric softener) if you want something more in sheet form.

Let me know if you try this out! It is so simple!

Tuesday, March 19, 2013

Thrifty Thinkin': How to Make Homemade {Potato} Bread


Since moving to Washington and trying to be as frugal as possible, I have taken up making all of our breads. Not that we spend loads of cash on bread, but it is still an improvement and it is so much better for you without the preservatives and chemicals! Plus, it tastes a heck of a lot better.


I don't have a bread machine, and I don't know anything too fancy. My mom taught me how to make bread when I was a kid, and lately I've just been experimenting with different recipes and variations. I am not much of a fan of store bought sandwich bread, but my husband is partial to Potato bread. Often I send him to work with sandwiches for lunch and potato bread is always his preference. After making bread for a couple weeks I started to play around with potato bread recipes. The outcomes have been mighty tasty and the husband is a fan of homemade bread now! Success! My loaves don't look like the store bought (WHY is potato bread always yellowish in the store? Potatoes aren't even yellow...?), but it tastes delicious!

Here is how I make it:

First off, to make bread you need YEAST.
I use an activedry yeast that needs to be "proofed" before you can use it in bread. A lot of people use instant yeasts, but I am not familiar with those and cannot speak for them...
First, preheat your oven to 200. Once it is warmed, shut it off. This will just be a warm area for the yeast and bread to do what they need to do.

For this recipe you need, 2 1/4 tablespoons of yeast. Put it in an bowl and add 1/4 cup of warm water and a table spoon of sugar. Mix it up and put it in the oven (now off!) for 10 minutes. The yeast should double in size by the time 10 minutes is up; this is how you know it is active and ready to use.

While you wait for the yeast to proof put these ingredients in a bowl:
3 cups of bread flour (potato flour can be incorporated here if you have it available, I however, do not have any of that yet),
 2 tablespoons of sugar,
 3/4 teaspoon of salt,
3/4 teaspoon of oil (I use olive),
1 cup of hot water,
1/2 cup of milk and
1/2 cup of mashed potatoes (I just prepared and used the flakey instant kind)
then add in your proofed yeast and mix all the dough together.

The dough should come together into a sort of sticky mess. If it is too dry, add a bit more water.

Then, clean and flour your counter (and your hands) where you will knead the bread.

 Next: knead that dough! I've always been told by my mother that you need to knead the dough until it feels "smooth like a baby's bottom." But if baby butt analogies don't quite help you understand how long something takes, I'd say something like 8 minutes. If you need a little help or refresher on kneading, HERE is a good Youtube tutorial which may help you!

Once you have kneaded the bread, place the dough into a well oiled bread pan and put it in the still-warm oven to rise for 1 hour. (If you want to form your own loaf and not use a bread pan, you should let it rise in a oiled bowl, covered with a damp dishtowel).


Once your hour is up and your bread is fully risen, take it out and heat the oven back up to 350. Bake the bread for 25-30 minutes or until golden brown. Allow to cool and slice.


 If left out or in the fridge, because the bread has no preservatives, it will go stale if not eaten in a day or two. If you have a big family, eat it up quick! Or, you can do like I do for just my husband and I. I place the slices in a freezer bag and freeze it, thawing it out as we need it for toast and sandwiches throughout the week.

Hope you enjoy this scrumptious bread! Be sure to have a nice thick slice with butter or cheese when it is fresh out of the oven and still warm! Nothing better!

LinkWithin

Related Posts with Thumbnails